Lean Startup Methodologies

During the last handful of years, a growing body of science has emerged to improve startup success. I call this science the Lean Startup Methodologies and I’ve helped many entrepreneurs understand and adapt them for use in their business. Many brilliant entrepreneurs, thinkers and educators have contributed to the Lean Startup revolution but I say there are three giants who formed the foundation:

  1. Eric Ries, who gave us phrases like Minimum Viable Product, Pivot, Product / Market Fit and most famously, the Lean Startup Feedback Loop:
    build_measure_learn
  2. Steve Blank, who gave us the Customer Development Process:
    customer-discovery
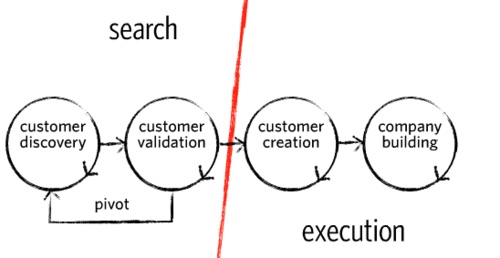
    Steve also gave us the optimal definition of a startup:
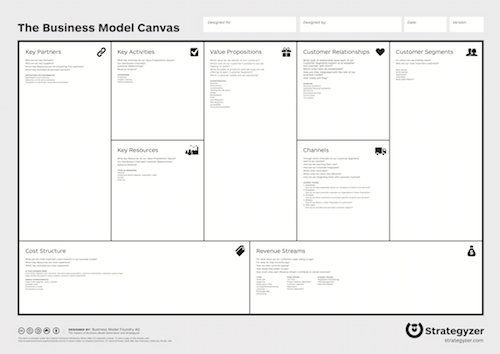
        A startup is a temporary organization used to search for a repeatable and scalable business model.
  3. Alex Osterwalder, who gave us the Business Model Canvas:
    Business_Model_Canvas

My summary of the Lean Startup Methodologies goes like this:

  1. Define your business hypothesis on your Business Model Canvas
  2. Build some minimally tangible representation of your product
  3. Identify the riskiest part of your hypothesis
  4. Decide upon one or more metrics that will help you test that risk with potential customers
  5. Discuss your product and hypothesis with potential customers and gather data for the chosen metrics
  6. Evaluate your results and create an updated copy of your Business Model Canvas and product representation then repeat your customer interviews
  7. As you’re zeroing in on Product / Market fit, make sure you test your Customer Acquisition Strategy and Pricing and do some larger scale quantitative testing
  8. When research proves you’ve got what the customer will buy, expand your Acquisition Strategy and make sure it’ll scale

Like most things worth doing, it’s easier said than done but that’s the process in a nutshell. I’ve run the Startup Alliance since 1999 and have always enjoyed mentoring entrepreneurs of all kinds. Get in touch if you’d like to discuss any of this.

You can reach me at:

Update: I was interviewed on these topics by Tony Wilkins on BlogTalkRadio in April 2015. Here’s a clip:

Explaining Heroku Custom Buildpacks

Web Dynos in the Heroku Cedar Stack are virtual servers with 500MB RAM and through the use of Buildpacks, these Web Dynos can run most anything. Heroku supports many popular languages through their Default Buildpacks and if that’s not good enough, Custom Buildpacks expand your options significantly.

Given a recent requirement to serve a one-page Javascript app (static HTML/CSS/JS), I knew the awesome Nginx web server would be a good fit and given the effective scaling, load balancing and failover the Cedar Stack provides, I figured a Custom Nginx Buildpack would be a good choice.

Starting with whatever documentation and sample Buildpacks I could find, I eventually succeeded but not without my share of trial and error. It really helps to understand the big picture as well as the details so that’s what I’m going to document here.

tl;dr

  1. Create your Buildpack and store it somewhere (Github) so Heroku can grab it each time you deploy your app. (The Buildpack orchestrates the Slug Compilation Process.)
  2. Make a Vulcan Build Server to build and package your code (Nginx in my case) and store it somewhere (S3) so Heroku can grab it and bake it into your Slug whenever you deploy your app. You may want to use a shell script to package and stage your binaries.
  3. For each app that’ll use your Buildpack, set the BUILDPACK_URL config var.

That’s it. When you deploy your app to Heroku, your Custom Buildpack will create a Slug for your app that’ll run on how ever many Web Dynos your workload requires.

Anatomy of a Buildpack

The only Buildpack requirements are these three bash scripts:

  • bin/detect – Looks for a trigger in the app to determine Buildpack applicability.
  • bin/compile – Controls the Slug Compilation process.
  • bin/release – Let’s you set default PATH and other meta data.

As you examine other Buildpacks, you’ll notice many with additional files. In my case, I felt my Buildpack was the right place to keep my Vulcan Build shell script and my Nginx configuration files. (If you go that route, don’t miss the note below explaining how to access files contained within your Buildpack at Slug Compilation time.)

What’s Vulcan for?

It’s a build server (check out the gem) that simplifies the process of compiling your app dependencies (for me, that’s Nginx and PCRE) on the target environment (a Heroku Web Dyno.)

The devil is in the details

  • Make sure your Heroku Account is Verified (CC on file.) Why? Because Vulcan has a dependency on the Heroku Cloudant Addon and that Addon won’t install itself if your Account isn’t Verified. (Github Issue. Thanks @ddollar!)
  • When you’re compiling your Slug, (while running bin/compile) the location of your Buildpack is available at $(dirname $0) so if you want to reference files within your Buildpack, you may want to use something like:
    BUILDPACK_DIR=`cd $(dirname $0); cd ..; pwd`. For an example, check out my bin/compile script. (Thanks again @ddollar!)

Summary: Custom Buildpacks FTW!

I hope this helps you take advantage of this incredibly powerful Heroku feature. I’ve been appreciating Heroku more and more and coming to understand Buildpacks has practically turned me into a Heroku fanboy. When we get around to putting our app into production, I’ll do some Nginx performance tuning and will try to remember to post my load test findings. I don’t expect price performance to match bare metal or dedicated virtual servers but considering the features Heroku delivers, I do expect a reasonable ROI.